Run OpenClaw on Google Cloud Platform (GCP) to keep your AI agent running 24/7 without relying on your local machine.
This setup is ideal if you want a reliable production deployment with low monthly cost and high uptime.
Minimum PC Requirements
| Component | Minimum Requirement | Recommended |
|---|---|---|
| CPU | Dual-Core Processor | Quad-Core (Intel i5 / Ryzen 5) |
| RAM | 4GB | 8GB+ |
| Storage | 10GB Free | 20GB+ |
| Internet | 10 Mbps | 25 Mbps+ |
| Operating System | Windows 10 / Linux / macOS | Windows 11 / Linux |
| Terminal Access | Command Prompt / PowerShell / Terminal | Windows Terminal |
| Browser | Chrome / Edge / Firefox | Latest version |
Recommended GCP VM Specs
| Machine Type | CPU | RAM | Recommendation |
|---|---|---|---|
e2-micro | Shared | 1GB | Not recommended |
e2-small | 2 vCPU | 2GB | Minimum |
e2-medium | 2 vCPU | 4GB | Recommended |
How to Run OpenClaw on GCP?
Step 1: Install the gcloud CLI
Install the Google Cloud CLI on your local machine:
https://cloud.google.com/sdk/docs/installOnce installed, initialize and authenticate:
gcloud init
gcloud auth login
Alternatively, every step in this guide can also be done through the Google Cloud Console at https://console.cloud.google.com/
Step 2: Create a GCP Project
Create a new project for your OpenClaw deployment:
gcloud projects create my-openclaw-project --name="OpenClaw Gateway"
gcloud config set project my-openclaw-project
Enable billing for the project at https://console.cloud.google.com/billing (required for Compute Engine). Then enable the Compute Engine API:
gcloud services enable compute.googleapis.comStep 3: Create the Compute Engine VM
Create a VM with Debian 12 and a 20GB boot disk:
gcloud compute instances create openclaw-gateway \
  --zone=us-central1-a \
  --machine-type=e2-small \
  --boot-disk-size=20GB \
  --image-family=debian-12 \
  --image-project=debian-cloud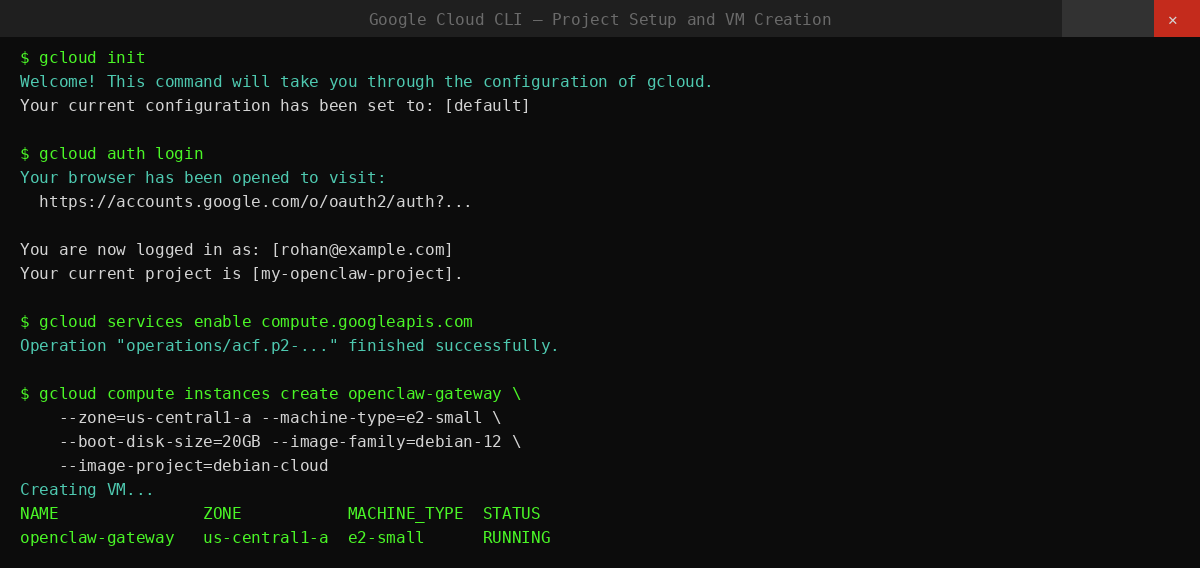
Step 4: SSH Into the VM
gcloud compute ssh openclaw-gateway --zone=us-central1-aIf the connection is refused, wait 1–2 minutes after VM creation for SSH key propagation, then retry.
Step 5: Install Docker
Inside the VM, run:
sudo apt-get update
sudo apt-get install -y git curl ca-certificates
curl -fsSL https://get.docker.com | sudo sh
sudo usermod -aG docker $USER
Log out for the group change to take effect:
exitSSH back in:
gcloud compute ssh openclaw-gateway --zone=us-central1-aVerify Docker is working:
docker --version
docker compose version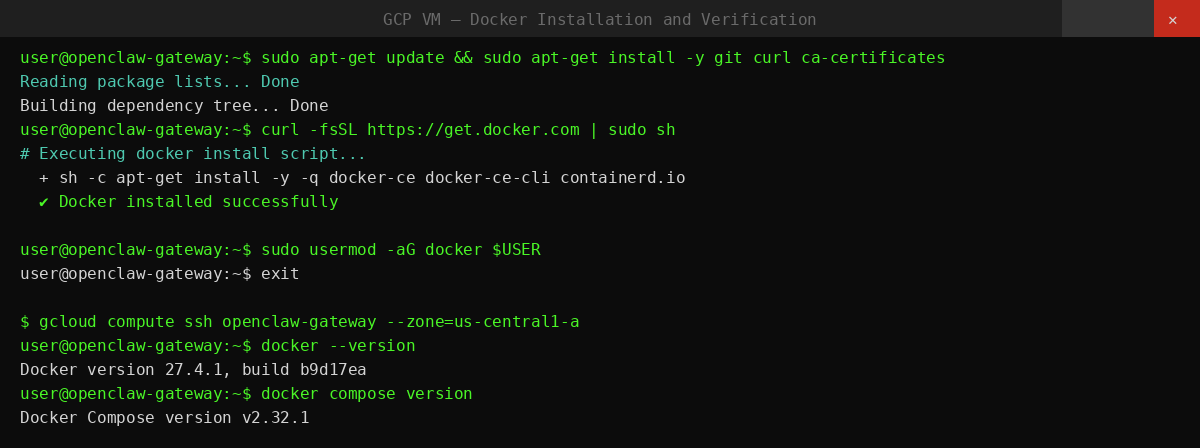
Step 6: Clone the OpenClaw Repository
git clone https://github.com/openclaw/openclaw.git
cd openclaw
Then create directories:
mkdir -p ~/.openclaw
mkdir -p ~/.openclaw/workspace
This ensures your config and workspace survive container rebuilds and VM restarts.
Step 7: Configure Environment Variables
Create a .env file in the repository root:
OPENCLAW_IMAGE=openclaw:latest
OPENCLAW_GATEWAY_TOKEN=change-me-now
OPENCLAW_GATEWAY_BIND=lan
OPENCLAW_GATEWAY_PORT=18789

OPENCLAW_CONFIG_DIR=/home/$USER/.openclaw
OPENCLAW_WORKSPACE_DIR=/home/$USER/.openclaw/workspace

GOG_KEYRING_PASSWORD=change-me-now
XDG_CONFIG_HOME=/home/node/.openclaw
Generate strong secrets for OPENCLAW_GATEWAY_TOKEN and GOG_KEYRING_PASSWORD:
openssl rand -hex 32Do not commit this file to version control.
Step 8: Configure Docker Compose
Create docker-compose.yml in the repository root:
services:
  openclaw-gateway:
    image: ${OPENCLAW_IMAGE}
    build: .
    restart: unless-stopped
    env_file:
      - .env
    environment:
      - HOME=/home/node
      - NODE_ENV=production
      - TERM=xterm-256color
      - OPENCLAW_GATEWAY_BIND=${OPENCLAW_GATEWAY_BIND}
      - OPENCLAW_GATEWAY_PORT=${OPENCLAW_GATEWAY_PORT}
      - OPENCLAW_GATEWAY_TOKEN=${OPENCLAW_GATEWAY_TOKEN}
      - GOG_KEYRING_PASSWORD=${GOG_KEYRING_PASSWORD}
      - XDG_CONFIG_HOME=${XDG_CONFIG_HOME}
      - PATH=/home/linuxbrew/.linuxbrew/bin:/usr/local/sbin:/usr/local/bin:/usr/sbin:/usr/bin:/sbin:/bin
    volumes:
      - ${OPENCLAW_CONFIG_DIR}:/home/node/.openclaw
      - ${OPENCLAW_WORKSPACE_DIR}:/home/node/.openclaw/workspace
    ports:
      - "127.0.0.1:${OPENCLAW_GATEWAY_PORT}:18789"
    command:
      [
        "node",
        "dist/index.js",
        "gateway",
        "--bind",
        "${OPENCLAW_GATEWAY_BIND}",
        "--port",
        "${OPENCLAW_GATEWAY_PORT}",
        "--allow-unconfigured",
      ]
The port binding 127.0.0.1:18789 keeps the gateway loopback-only on the VM. You access it securely through an SSH tunnel.
Step 9: Build and Launch OpenClaw
Build the Docker image and start the container:
docker compose build
docker compose up -d
Check the container is running:
docker compose ps
docker compose logs -f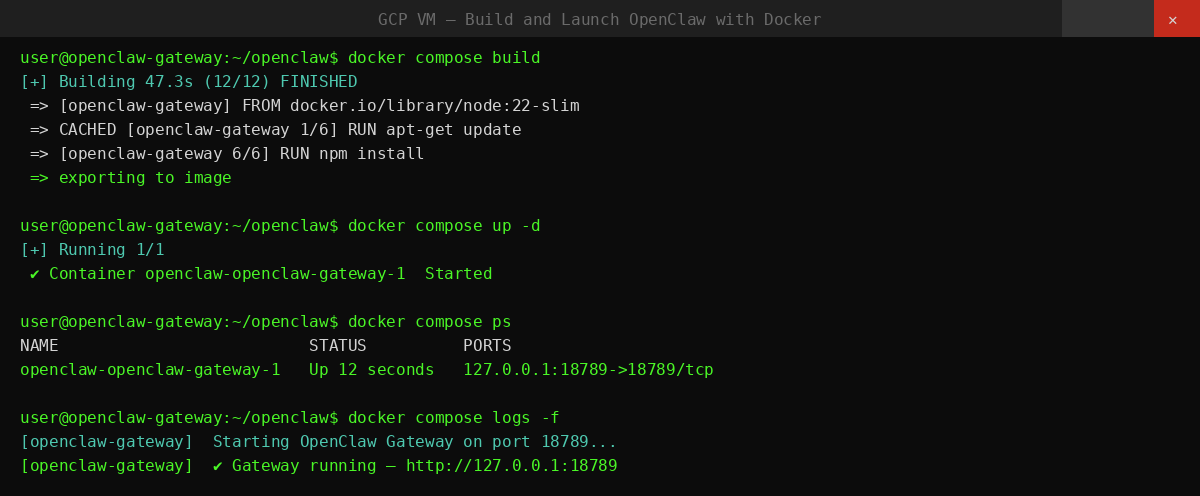
Step 10: Configure Allowed Origins
When binding to LAN, set the trusted browser origin:
docker compose run --rm openclaw-cli config set gateway.controlUi.allowedOrigins '["http://127.0.0.1:18789"]' --strict-jsonStep 11: Access the Dashboard from Your Local Machine
From your local machine (not the VM), open an SSH tunnel:
gcloud compute ssh openclaw-gateway --zone=us-central1-a -- -L 18789:127.0.0.1:18789Open in your browser:
http://127.0.0.1:18789Get a tokenized dashboard link:
docker compose run --rm openclaw-cli dashboard --no-openIf the dashboard shows unauthorized or disconnected (1008): pairing required, approve your browser:
docker compose run --rm openclaw-cli devices list
docker compose run --rm openclaw-cli devices approve <requestId>
After setup, connect a messaging channel — Telegram, WhatsApp, Discord, Slack, Microsoft Teams, or any other supported app — to start chatting with your agent.
Common Issues and Fix
| Issue | Fix |
|---|---|
| SSH connection refused | Wait 1–2 min after VM creation for SSH key propagation |
| Docker build fails (exit 137 / OOM) | gcloud compute instances set-machine-type openclaw-gateway --zone=us-central1-a --machine-type=e2-small |
| docker: command not found | Log out and back in after sudo usermod -aG docker $USER |
| docker compose not found | sudo apt-get install -y docker-compose-plugin |
| Gateway container not starting | docker compose logs -f to check error output |
| Dashboard shows unauthorized | docker compose run --rm openclaw-cli devices approve <requestId> |
| OS Login permission error | gcloud compute os-login describe-profile — check IAM permissions |
| Container stops after reboot | Confirm restart: unless-stopped is set in docker-compose.yml |
If you prefer to skip these setup steps entirely, you can deploy OpenClaw on Ampere.sh in 60 seconds. No Docker, no config files, no infrastructure management required.
Frequently Asked Questions
What is OpenClaw on GCP?
Can I use GCP free tier for OpenClaw?
Do I need Docker to run OpenClaw on GCP?
Does OpenClaw continue running if I close my PC?
Can I upgrade my VM later?
What happens if my VM stops?
Do I need technical knowledge?
Can I connect OpenClaw to Telegram or WhatsApp?
Avoid Cloud Configuration
Setting up OpenClaw on GCP requires VM creation, Docker setup, and networking configuration. Run OpenClaw on Ampere.sh and start your AI agent in 60 seconds.
Deploy on Ampere.sh →