Most people run OpenClaw on their laptop — and it works fine, until the laptop closes. A VPS changes that completely. Your agent stays online around the clock, responds to messages while you sleep, and runs automations on schedule without you touching anything. For $5–6 a month, it's one of the most reliable ways to run a personal AI agent.
If you'd rather not deal with servers at all, Ampere.sh handles the entire setup — hosting, updates, and maintenance — so you get all the benefits of a VPS without managing one yourself. But if you want full control and want to set it up yourself, this guide walks you through every step.
Choosing the Right VPS for OpenClaw
Any Linux VPS with at least 1GB RAM works. Here's a quick comparison of popular options:
TL;DR: For the best value, go with Hetzner (€3.79/mo, 2GB RAM). For zero setup and full management, use Ampere.sh. For easiest DIY setup as a beginner, choose DigitalOcean.
VPS Requirements for OpenClaw
What You'll Need
- •A VPS running Ubuntu 22.04 / 24.04 LTS or Debian 11 / 12 — minimum 1 vCPU, 1 GB RAM, 10 GB SSD. DigitalOcean, Hetzner, Vultr, or Linode all work
- •Node.js 22+ — installed via NodeSource (the default apt version is too old)
- •An API key from an AI provider — Anthropic (Claude), OpenAI (GPT-4o), or Google Gemini
- •An account on your preferred messaging platform — Telegram is the easiest to start with on a VPS
- •SSH access to your VPS — either password or key-based (key-based recommended)
How to Install OpenClaw on a VPS (Step by Step)
Follow these steps in order. The entire process takes about 10–15 minutes on a fresh VPS.
Step 1: Connect to Your VPS via SSH
Open a terminal on your local machine and connect to your VPS:
ssh root@your-vps-ip-address

# Example
ssh root@167.99.123.45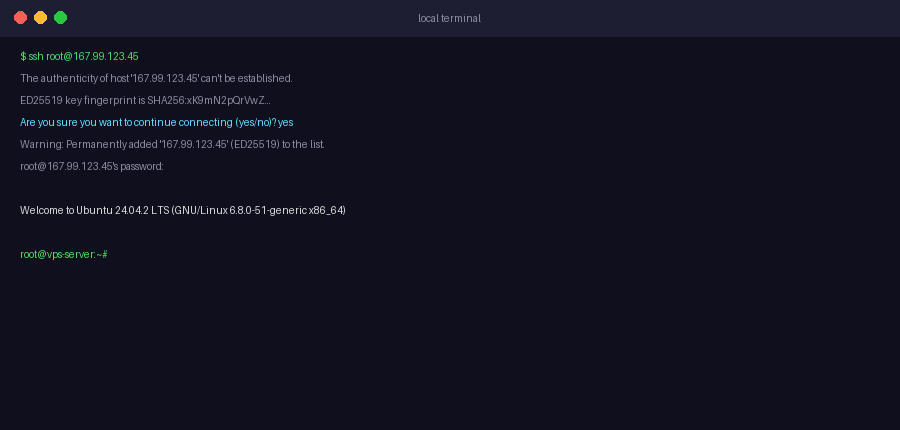
Step 2: Create a Non-Root User and Harden SSH
Running OpenClaw as root is a security risk. Create a dedicated user, grant sudo access, and disable root/password SSH login:
# Create a new user (replace "openclaw" with any username)
adduser openclaw

# Grant sudo privileges
usermod -aG sudo openclaw

# Switch to the new user
su - openclaw
Then harden your SSH config to block brute-force attacks and root login:
sudo nano /etc/ssh/sshd_config

# Set these two values:
PasswordAuthentication no
PermitRootLogin no

# Save and restart SSH (keep your current session open)
sudo systemctl restart ssh
Important: Make sure you have SSH key access set up before disabling password authentication — otherwise you'll lock yourself out.
Step 3: Update Your VPS
sudo apt update && sudo apt upgrade -y
sudo apt install -y curl wget git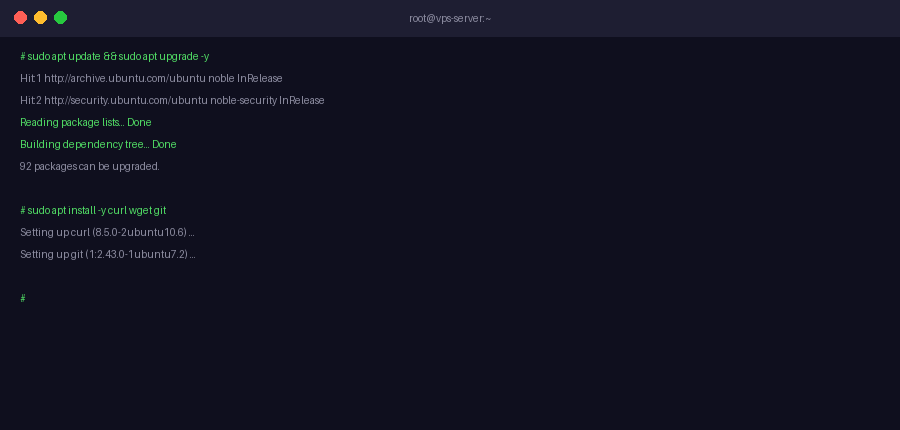
Step 4: Install Node.js 22+ via NodeSource
OpenClaw requires Node.js 22 or higher. Use NodeSource to install it — the default apt version is too old:
curl -fsSL https://deb.nodesource.com/setup_22.x | sudo -E bash -
sudo apt install -y nodejs

# Verify
node --version   # Should show v22.x.x or higher
npm --version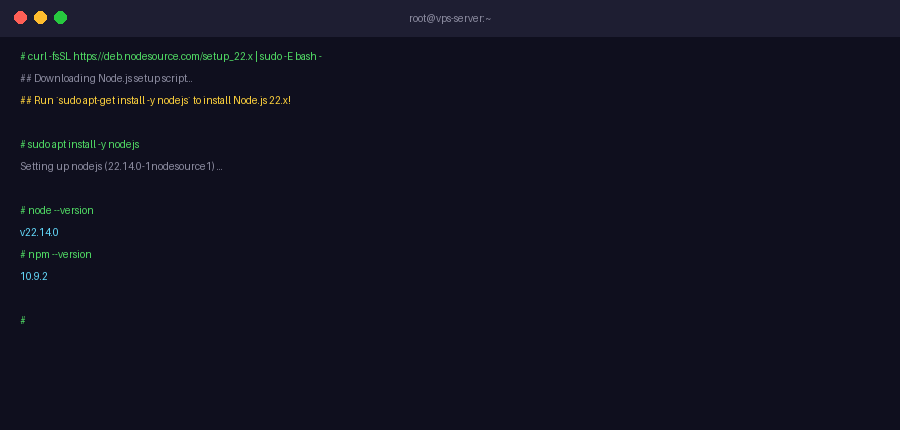
Step 5: Run the OpenClaw Installer
curl -fsSL https://install.openclaw.ai | bashAfter the installer finishes, reload your shell:
source ~/.bashrc
openclaw --version
Check the gateway binding: After install, run openclaw gateway status and verify the gateway is bound to 127.0.0.1:18789 — not 0.0.0.0:18789. If it shows 0.0.0.0, the dashboard is publicly accessible without authentication. Fix it by running openclaw configure and selecting Local (this machine) for gateway binding.
Step 6: Run the Onboarding Wizard
openclaw onboard- Accept the security advisory — select "Yes, I understand"
- Choose QuickStart for safe defaults
- Select your AI provider (OpenAI, Claude, Gemini, or others)
- Enter your AI provider API key
- Skip skills for now — you can add skills later
- Enable bash shell completion when prompted
Step 7: Connect a Messaging Channel
Option A: Telegram
- Open Telegram and search for @BotFather
- Send
/newbotand follow the prompts to create a bot - Copy the bot token BotFather gives you
- Run:
openclaw connect telegram— paste the token when prompted - Your agent is now live on Telegram
Option B: WhatsApp
- Run:
openclaw connect whatsapp - Scan the QR code with WhatsApp → Settings → Linked Devices → Link a Device
Step 8: Enable Auto-Start with systemd
This keeps OpenClaw running 24/7 — even after SSH disconnects or server reboots:
openclaw onboard --install-daemon

# Verify it's running
systemctl status openclaw
You should see Active: active (running). Your agent is now live around the clock.
Step 9: Secure Your VPS with UFW Firewall
Block the OpenClaw dashboard from public internet access and rate-limit SSH to slow down brute-force attempts:
sudo apt install -y ufw

# Block all incoming by default
sudo ufw default deny incoming
sudo ufw default allow outgoing

# Allow SSH with rate limiting (blocks IPs after 6 attempts in 30s)
sudo ufw limit 22/tcp

# Block dashboard port from the internet
sudo ufw deny 18789

# Enable firewall
sudo ufw enable
sudo ufw status verbose
Accessing the Dashboard via SSH Tunnel
Since port 18789 is blocked externally, access the dashboard securely from your local machine using an SSH tunnel:
# Run this on your LOCAL machine (not the VPS)
ssh -N -L 18789:127.0.0.1:18789 openclaw@your-vps-ip

# Flags explained:
# -N   Don't execute remote commands, just forward the port
# -L   Forward local port 18789 to remote 127.0.0.1:18789
Keep that terminal open, then open your browser and go to:
http://localhost:18789Keep that terminal open — the tunnel must stay active for the dashboard to remain accessible.
Testing, Securing, and Troubleshooting Your OpenClaw Setup
Testing Your Installation
Once installed, verify everything is working correctly before connecting a messaging channel:
# Check OpenClaw version
openclaw --version

# Check gateway status and binding
openclaw gateway status

# Run built-in diagnostics (checks config, connectivity, API key)
openclaw doctor
The openclaw doctor command automatically identifies and fixes the most common configuration issues — run it any time something isn't working as expected.
Securing Your OpenClaw Setup
A few essential checks to make sure your VPS-hosted agent is locked down:
Verify gateway binding
Run openclaw gateway status and confirm the gateway shows 127.0.0.1:18789 — not 0.0.0.0:18789. If it shows 0.0.0.0, your dashboard is exposed to the public internet without authentication.
Confirm UFW is active
Run sudo ufw status verbose to confirm port 18789 is blocked and SSH is rate-limited. Never expose the dashboard port to the public internet.
Keep API keys private
Your AI provider API keys are stored in ~/.openclaw/openclaw.json. Never commit this file to version control or share it publicly. For a full hardening checklist, see the OpenClaw security guide.
Disable root SSH login
Confirm PermitRootLogin no is set in /etc/ssh/sshd_config. Log in only as a non-root user with sudo — never as root over SSH.
Troubleshooting Common Issues
Installer fails or hangs midway
This usually happens on low-RAM VPS instances (under 512MB) or when the interactive UI fails to load. Use the --no-gum flag to bypass the UI:
curl -fsSL https://install.openclaw.ai | bash -s -- --no-gumOut of memory errors during install
Upgrade to at least 1GB RAM, or add a temporary swap file:
sudo fallocate -l 1G /swapfile
sudo chmod 600 /swapfile
sudo mkswap /swapfile
sudo swapon /swapfile
openclaw: command not found
Reload your shell after install — the PATH update isn't applied to the current session automatically:
source ~/.bashrcOpenClaw stops after closing SSH
This means the systemd daemon isn't installed. Run openclaw onboard --install-daemon to register OpenClaw as a service, then confirm with systemctl status openclaw.
Frequently Asked Questions
Which Linux OS should I use on my VPS for OpenClaw?
How much RAM does my VPS need to run OpenClaw?
Can I run OpenClaw on a free VPS?
Will OpenClaw keep running after I close my SSH session?
How do I access the OpenClaw dashboard on a VPS?
Can I run multiple OpenClaw agents on one VPS?
How do I update OpenClaw on my VPS?
Is it safe to run OpenClaw on a public VPS?
Skip the VPS Setup — Let Ampere.sh Handle It
Don't want to manage a server? Ampere.sh deploys and maintains your OpenClaw agent in the cloud — no VPS, no terminal, no maintenance required.
Try Ampere.sh